


 Photoshop Templates
 Resources


Inserting Image Maps in Dreamweaver
An image map is divided into different active regions which are marked as hotspots indicated by a light blue - green highlighted shape. A new page or file is opened when the user clicks on this hotspot.
An Image map in Dreamweaver is created from the 'Property Box'. This is done by right-clicking on the image and selecting 'Properties' from the drop-down.
From the Property box, one of the three Map icon tools is selected. Then a name is assigned to the Image Map. To define the map area the user can select one of the three Image map shape tools, rectangle, circle or the polygon tool over the image. Here a Hotspot property will appear. The Link and the target for the Hotspot can be set in the Property inspector dialog box.
The vertical space, horizontal space, border, alt text, and alignment can be set by using the Property inspector.
Example:
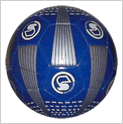
Suppose a page is created and on this page you want to insert an image map. To do so, first you need to insert an image in the webpage. Say, you have inserted an image of a football in the page. After inserting the image the following steps can be followed:
• Select the image by clicking on it.
• The Property inspector dialog box will be open.
• Here assign a unique name to the image, it can be anything.
• Select the Map option.
• Click on one of the Hotspot Tools to the image.
• For example, here select the Oval Hotspot Tool and click on the image. Drag the circle to enlarge and cover the area.
• The Image map will be created with oval hot spot border.
• Enter the page name or site URL in the 'link' option.
• This is how the image will look :
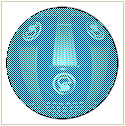
Here's another example, which requires just a little more skill. The screenshot 'Littlestars' shown below is taken from one our templates. The menus on the Notepad paper is one whole image as opposed to 6 separate navigation menu images.

We want to create 6 image maps to link to 6 pages that correspond to the menu labels.
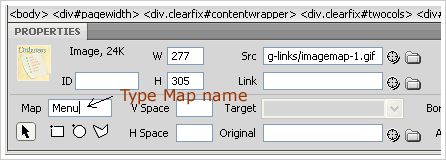
Step 1 : Select the image and open the 'Property Panel'. Assign a Map name.
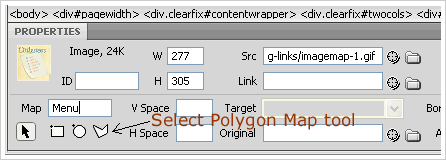
Step 2 : Click on the 'Polygon Image Map Tool' (third icon)
Step 3 : On the first 'home' menu label click near the top corner to it, to make a point. Click again on all corners. The last point will form the Hotspot box around the 'Home' label.
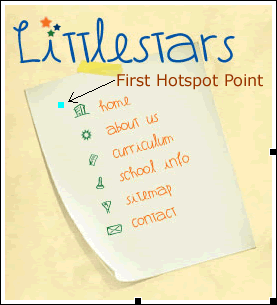
Step 4 : Enter the page name or URL in the 'Link' option. You can browse to the location of your file.
Step 5 : Repeat step 3 with the remaining menu labels. Remember to assign a Image Map name for each menu label and link to the appropriate html page or site.
Click here to learn how to create Links in Dreamweaver.
