Photoshop Templates
 Resources


Creating - inserting Rollover buttons in Fireworks and dreamweaver CS5
Learn how to choose and create a new layout in Dreamweaver.
- Open Fireworks and create a new document with the dimensions '150 width x 150 height', using a white background.
- Select the rectangle tool
 from the toolbox and create a rectangle with a black or any other color solid fill. In the 'properties' box select the 'rectangle roundness' to 30. Also, select 'Gradient > linear', next to the color fill pallette. The linear effect is optional, but gives the button an enhancement.

- Select the text tool
 and type a label for the button. In the properties box, select the color #FFFFFF (white) for the text and font size 14. In our example, we chose the font 'BankGothic MD BT'.
From the main menu 'select > select all'. Then 'modify > align > center vertical' and 'modify > align > center horizontal'.Your text will be neatly aligned inisde the rectangle.

- Create a new frame, 'edit > insert > new state'. State 2 will appear empty. Select State one and from menu 'select > select all'. Next, 'edit > copy'. Switch to State 2 and 'edit > paste.
State 2 will be our rollover state for the button. So we will add a little effect to it. In our example, we are using an 'inner bevel' effect, but you can use ANY effect yourself, like inner shadow or glow to give the rollover state a unique look and color.
- In State 2, select the rectangle and in 'properties' choose 'filter > bevel and emboss > inner bevel'. Select the settings for the bevel effect as below:
Let's also change the color to a darker green shade.
Select the button and from the 'Properties' box, click on the color pallette next to 'Linear'.
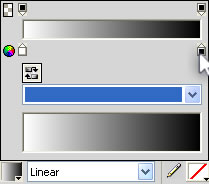
Click on the bottom right slider and choose a different color, let's say we choose #003300.
This is how your button for 'State 2' will appear as:

From the 'States' Panel, click on state 1.
Select the button in the main window and crop it ( Edit > Crop Document ).
- Let's export the button now. From main menu select 'File > Export'. The 'Export' dialog box will appear. Export the button as 'image only'. Save it as 'button-1.gif' to your images folder.
- Switch back to 'State 2' in the 'States Panel' and select State 2. Export the button for Rollover state (State 2) using the same method as 'step 6' but this time save it with another name 'button-1_s2.gif.
Inserting your rollover buttons in Dreamweaver
When you have exported the buttons for State 1 and State 2 (rollover), follow these instructions for inserting them in your Dreamweaver Document:
- Open your html document in Dreamweaver and place your cursor over the place where you wish to insert your rollover button.
- From main menu select 'Insert > Image Objects > Rollover Image'.
- In the 'Export Rollover Dialog' box that appears assign a name for your button, enter the location of both your normal state button and your rollover state button by browsing to the site folder usually your 'images' folder. Enter 'Alt text' for SEO and then enter the page name or URL when the button is clicked on. Click 'OK'.
For creating more buttons, just change the text for both State 1 and State 2, then when you export the buttons, assign them different names such as button 2, button 3 etc...
You can insert your rollover buttons in Dreamweaver both vertically or horizontally.
Using the same steps you can insert Rollover Images in Dreamweaver. Here is an example:
Sample 1 - Rollover the image