
Most of our Dreamweaver/Photoshop combination templates are very easy to edit, since usually only the logo requires editing in Photoshop 7+. If you don't have a copy of Photoshop, you can either download a free trial version from Adobe or ask us to do edit it with your site name at no additional cost to you (Paid clients).
If you get error messages when you attempt to open the PSD source file, it means that you may be using an older version of Photoshop. To remedy this use a recent version. If you get a prompt to 'update layers' click 'o'kay'.
Here we provide a generic customization guide that can really be applied as guidance to nearly all our Dreamweaver/Photoshop templates.
Install fonts first
If the template came with any associated fonts, be sure to install these to your system fonts folder before editing the PSD source file. Access your system fonts folder from 'Control panel > fonts'.
Click on 'file > install new font'. Browse to the subfolder named 'font' of your downloaded template files and select from the list of fonts that appear and click 'o'kay'.
Editing the logo
Open the source PSD file in Photoshop version 7 + (later versions including CS+ are compatible). If you get an missing fonts error after having installed any associated fonts, do not worry. They most likely will be font errors for text that you may never edit in the source file such as the dummy lorem ipsum text.
![]()
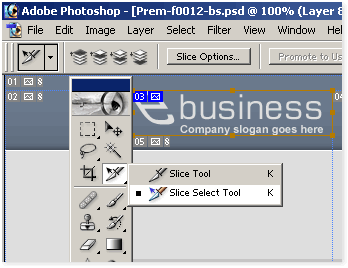
Click on the text 'T' tool in 'tools panel' and place your cursor over the Logo text 'BUSINESS' and replace with your own site name.
Editing the slogan
To edit the slogan,place your cursor over the Logo text 'Company slogan goes here ' and replace with your own slogan.
Exporting the slice
To view the slices, select from menu 'view > extras' and 'view > show slices'.
Tip: If your site name is too long to fit inside the slice, you can expand the width of the slice. Select the 'slice select tool' in the tools panel and click on the slice around the logo, so that it has 8 small rectangles around it as shown in the screenshot below.
Place your cursor on the right edge rectangle so that it changes into 'drag cursor' with arrows, hold your left mouse key down and drag the right side guidelines so that the slice expands to the right, repeat this with the left-side.
Now, to export the slice, select from the main menu 'file > save for web'. The save for web dialog box will appear, click on the second icon at the top left hand side and then select the logo slice area with your cursor so that the slice guidelines appear in the color yellow. In the options on the right, save the logo slice in gif format. Use jpg for higher quality photo images or areas where there are gradients.
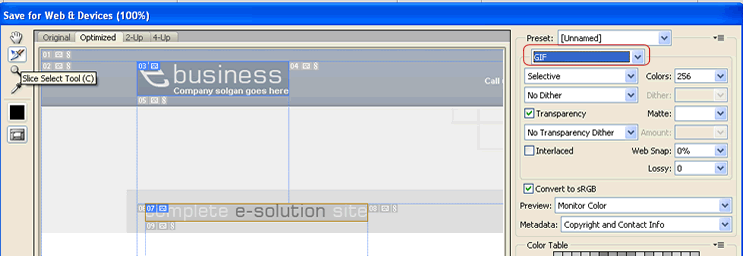
Tip: If you are working with may slices you can select all the slices in the 'save for web' dialog box by selecting each slice area with the shift key held down.
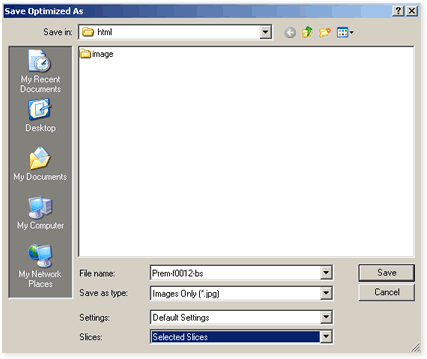
When you select 'save' make sure that you are saving the logo.gif slice in the main site folder outside the image or images folder. If your folder is named images then you will get a prompt to overwrite the existing logo.gif. If your folder is named image, then a seperate folder will be created named 'images', your logo.gif slice will be exported here. Copy this to your 'image' folder.
When exporting make sure you save as:
Images only > selected slices only
IMPORTANT: If your logo is long, you will need to resize it in your html editor. In Dreamweaver, open each html file, select the logo and right-click with your mouse. Now, select 'resize' from the pop-up.
Replacing with your own logo
You can also replace the template with your own logo. Make sure it has a transparent background so it blends well. Open the source PSD file first and then open your logo in a different window, minimize both windows and select > drag your logo onto the template source PSD file just over the area of the logo text. Now, hide the logo and slogan text in the layers panel and export the slice as normal.
Replacing images in client boxes or thumbnails
First resize your new images to the dimensions 145 X 79 pixels and save them as jpgs, open the index.html file and delete the images and insert with the new ones.

Editing the html files
Open the index.html in any html editor and replace the text for the side navigation links for your own labels, by manually typing. Change the footer links to correspond.
Replace the dummy content for your own text and images and save. Much of the layout incorporates CSS, for faster load time.
Uploading files
When you have completed your project, use a FTP utility to upload your files 'as is', in the same format, without changing any names unless your html file names are different. We recommend CuteFTP, to upload your files. You do not need to upload your PSD file. Make sure you make a backup copy of all your site files.
Complete customization service
If you require a sub-page/inner page for your template, we can usually create one for $20 - $30 per page. If you require a complete site customization of several pages, the the cost would be between $100 - $250, excluding any script work. Contact us with your requirements.
© Copyright 2002 - 2008, Dreamweaver-Templates.net